Featured
Posted in Salesforce

Achieving Salesforce DX is not a Daydreaming!

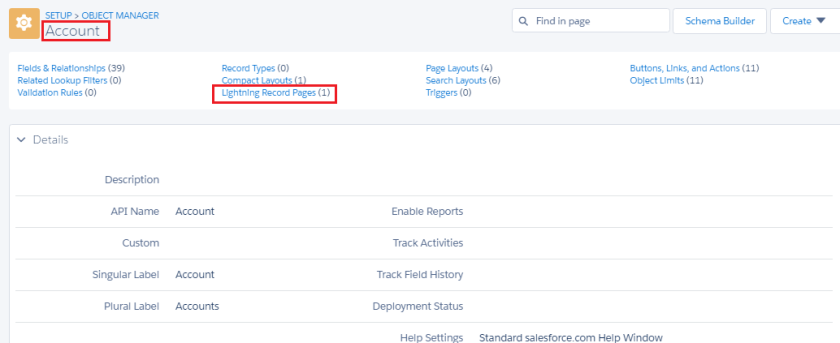
At Dreamforce’16, Salesforce announces Salesforce DX, a modern approach to develop applications on the Salesforce platform, where developers can connect any of their tools. The main focus of Salesforce DX is moving from Org Based Development to Source Driven Development.

With this, developers have to sync their Salesforce Orgs with Version Control System (VCS) to track every change done by the developers.  Now developers need to have a good knowledge about VCS.

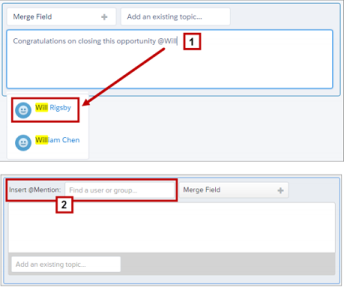
What is a Version Control System? What is a Repository? What is a Branch? What is a Commit/Check In? What is a Merge?

What about Admins? Do admins also need to learn all these developer tools and do they need to remember all commands for achieving DX with Command Line Interface (CLI)?

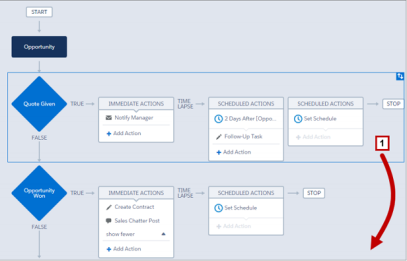
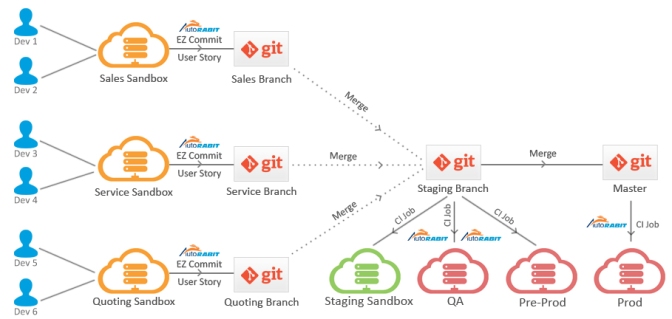
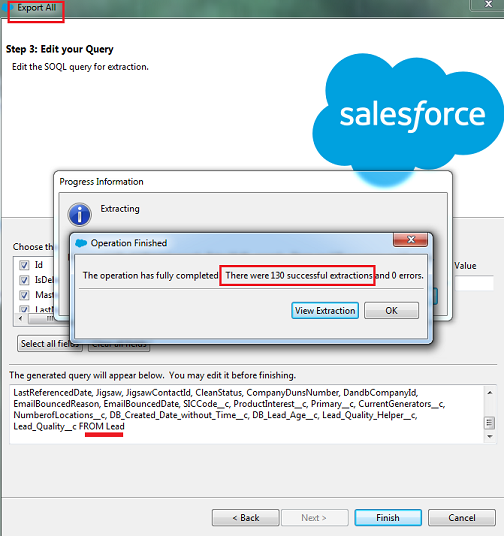
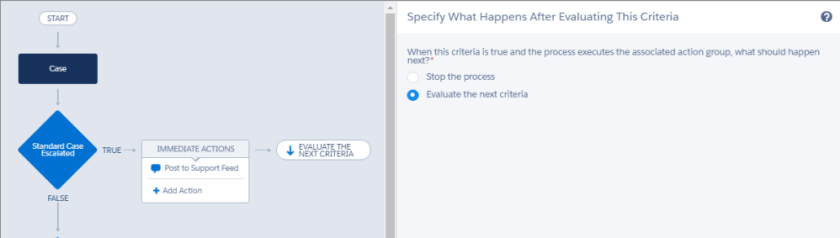
Answer would be No! With AutoRABIT release management platform, anyone either it could be developer/admin/release manager will be able to achieve Continuous Integration with few clicks using GUI instead of CLI. A process flow will be defined for your organization then you do Declarative/Code level changes to sandbox and then push the changes to Version Control and then deploy from there to Production/Sandboxes. Below is the sample process flow which is designed for X organization to achieve Continuous Delivery.

flow6

Here are few links to check around features you can achieve Continuous Delivery with AutoRABIT:

Contact me if you would like to know more about it at salma.k@autorabit.com

Posted in Salesforce

Salesforce 18th Birthday

In general, I remember only Women’s Day on 8th March but now I’ve started remembering the Salesforce Birthday as well 😀

Tomorrow is Salesforce 18th Birthday and I would like to thank and wish “Happy Birthday” to all Salesforce Employees, Customers, Partners, Non-Profit Organizations etc.

SF Cake

Fortunately, I’ve started my IT career with Salesforce platform and I’ll be proudly saying everyone that I know Salesforce and I’ve earned 100+ Trailhead badges. I would like to THANK Everyone who has helped me either directly or indirectly for learning Salesforce.

And I would thank “Marc Benioff” for taking a stand on EqualityForAll.

Salesforce CEO Marc Benioff: We’re Erasing Our Gender Pay Gap—Again

Fortune Global Forum - Day 2

As a leader of Mumbai Women in Tech User Group, I wish everyone women “Happy Women’s Day”. Let’s encourage women to work in IT, network in IT. I thank “Geraldine Gray” founder of WIT (formerly Girly  Geeks) for originating such a lovable idea


Posted in Salesforce

Learn/Revise: Mass Email List Views in Salesforce

By seeing Title, one can imagine of sending Mass Emails by clicking on “Mass Email” button on List Views, if you’re not but I have imagine in same way :D.

I hope many are aware about the ‘Mass Email List Views’ in Salesforce, if you’re not then continue reading the blog I bet you will be surprised as I have.

Goal: One of my client told me to create Mass Email List Views on Lead object. For a second, my mind is thinking like, ‘Is she is crazy? we’ve List Views in Salesforce’. I thought, she want to send ‘Mass Email’ to Leads by selecting any one of List View.

But I’m not sure on myself as well. So, I dig into this by doing some research/browsing in Google. After couple of mins, I came to know the Fact.

We have “Mass Email Leads” link on Tools section on Leads Home Page, as per displayed screen below.Lead Home Page.png

You can create, list views on ‘Mass Email Recipient Selection’ page by clicking on ‘Create New View’ link, as per below screenlead-home-page 
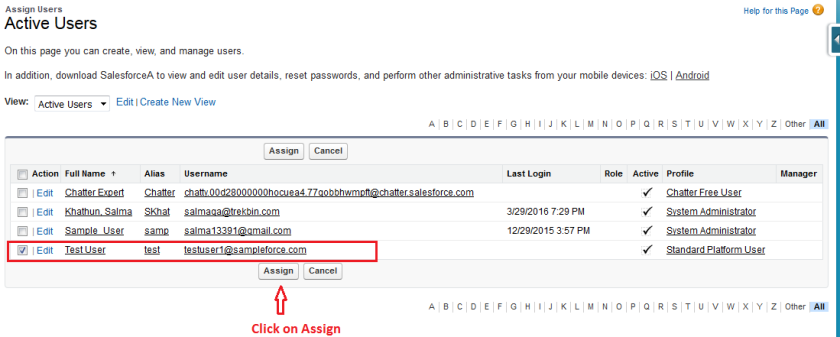
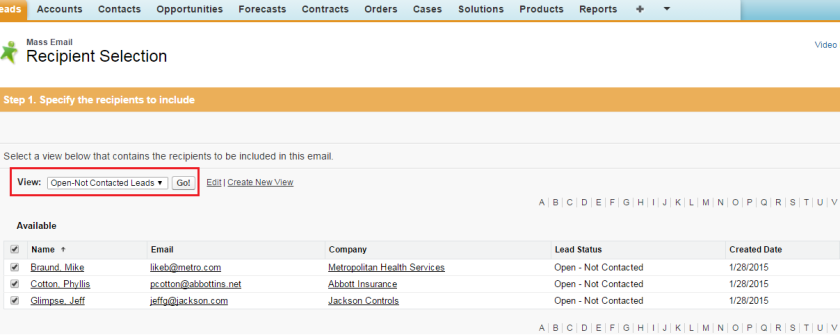
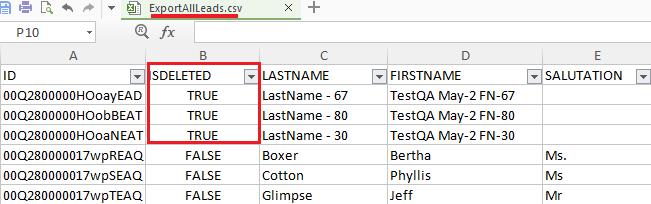
I want all Leads who’s Status=Open-Not Contacted, so I have created list view as below:Lead Home Page.png

Once you save the view, you’ll navigate back to List View page as per below screen, so simple 🙂lead-home-page

Posted in Drawloop DDP, Salesforce

Pulling all Contacts on Event to show in DDP

Goal: 

Let’s consider that I’m conducting a WIT Meetup on 5th Dec, 2016. So, I need the attendees list coming for this meetup in PDF format.

I have created an Account in Salesforce as “Salesforce Mumbai WIT Meetup”. And created an Event with Subject as “December WIT Meetup” and all attendees will be listed on “Name” field on Event.

account

Event detail page:

event-detail

Note: You’ve to Enable Multiple Contacts on Activity Settings

Creating DDP: I’ve created a DDP as ‘Attendees on Event’ on Account. Created 2 Relationship records for fetching Earliest Event associated with Account and for fetching Contact’s details from Event.

  1. Earliest Event on Account: For fetching earliest and not completed event, I’ve given filter condition as per below screenshot
    earliest-event
  2. Pulling Contacts from Event: In SFDC, values on ‘Name’ field, it can be Contacts/Leads can be queried by using “Event Relations” object.
    • Created a Relationship by selecting relation type as “SOQL”
    • Firstly, fetching all Contacts i.e., RelationID from Event (Event queried from the above screenshot)
    • Secondly, fetching Contact details by using Inner Query as per below screenshot
      contacts-on-event

DDP Template:

Now, we got all relationships associated with DDP and will be preparing the DDP Template by using Field Tagger as per below screenshot. Prefixing <<C1_Start>> field tagger for Row Replication to display more than 1 Contact associated with Event.ddp-template

Running DDP:

All is Set now, I’m navigating to ‘Salesforce Mumbai WIT Meetup’ Account detail page and clicking on “Generate Documents” DDP button. Then click on Run button.ddp-page

DDP.png

Posted in Salesforce

Professional Edition – Now Export Data Any Time

Olaaa Professional Edition 😦 😐

With the limitations associated with Professional Edition, it’s been always a challenging while working on this org. Today I’m blogging solution for one of such problem.

Known Fact: API is not enabled for Professional Edition
You have to pay extra to Salesforce for Enabling API.

So, if you have a requirement to EXPORT data, then we can’t use DataLoader. Hey, we can use “Data Export” under Data Management section from Setup.

Just a sec, before you start your Export from “Data Export” section. As per, Salesforce Documentation, you can generate backup files manually once every 7 days (for weekly export) or 29 days (for monthly export). In Professional Edition and Developer Edition, you can generate backup files only every 29 days.

What if you’re unlucky just like me :(. I have already done Data Export 1 time per day. Now I want to export more Data again.

Lakshmi Prasanthi gave some of her luck to me ❤ 😀  Just we can use “Export Details” button on Report.

If you want to export Opportunity data in Professional Edition org, then simply create an Opportunity Report and then export the data by using “Export Details” button, yeah !!opportunity-report

Select the required format either .xls or .csv while exporting and click on “Export” button.opportunity-report-format

Note: Don’t forget to add fields which you require to the Report and check the is there any filter conditions on report before you actually Export data


Posted in Drawloop DDP, Salesforce

Row replication in Drawloop DDP

One can pull all child object records into document by using row replication tag in drawloop.

You want a word document with all Closed Won Opportunities list associated with respective account. If you are very new to Drawloop then check about installation and creating a DDP.

Firstly create a DDP as “Closed Won Opportunities”, by selecting the record type as “Account” as we are running DDP from account.

DDP1.png

I have given access to only System Admin profile users for running the DDP. Also I have attached the “Closed Won Opportunity DDP” word document, which contain information as below.

ddp2

Create Opportunity Relationship:

  • Now it’s all about creating Relationship record for above DDP and using the field tagger for tagging fields in the word document.
  • Let’s create a Opportunity relationship to Account in “Closed Won Opportunities” DDP as below

ddp3

  • So, we have given filter condition as “Stage=Closed Won” in the filter section.


Run DDP on Account:

I have created an Account as ABC Company and it contains 3 opportunities. But account has only 2 closed won opportunities.

ddp4

I have clicked on “Run DDP” button on the ABC Account and generated document contain only one Closed Won Opportunity 😮 as below

ddp5

Problem is with Field Tagging in DDP:

If we want to pull all opportunities which are closed won then we have to add row replication tag to the starting of Opportunity Name in the DDP template. Go to “closed Won Opportunities” DDP and click on the Field Tagger link/button.

ddp7

Now I am adding “<<Opportunity_Start>>” field tagger to prefix of opportunity name in  DDP template as shown below

ddp6

Now again run the DDP on the ABC Company and check that we got all closed won opportunities on the generated document.

ddp8

ddp9

Simple adding row replicator tagger where ever you want for replicating the rows 🙂

Posted in Salesforce

Data Loader Export and Export All

I have been using Data Loader now and then every time but didn’t realize the exact difference between Export and Export All buttons while using.

One day, I got request from client to take backup of Production org. And started taking backup of all objects which contains at least one record in org. For checking this, I have navigated to Setup > Administer > Data Management > Storage Usage. We can check record count for objects under “Current Data Storage Usage” section.

I have logged to Data Loader and started exporting data by clicking on “Export All” button (as it is Production org unconsciously clicked on Export All) for each object displayed in the “Current Data Storage Usage”. Suddenly, I have encountered that record count for object I have exported from Data Loader is more than the count displayed in the Storage Usage.

So, here by I have started searching the differences between Export and Export ALL buttons.

Export: Fetch all active/current records for the selected object
Export All: Fetch all active/current + Soft Deleted + Archived records for the selected objects

Here is the example, the record count of Lead records is 127 when check in Storage Usage.Storage Usage

Now I have exported the Lead records from Data Loader by using both Export and Export All buttons. From Export, the total count of Lead records is 127 while from Export All, the record count is 130.Export Lead

Export All Lead

So, how we can see this difference of records?  By checking the ISDELETED (while exporting select all fields) field in the csv file. There are 3 deleted Lead records in the ExportAllLeads.csvCSV


Posted in Salesforce Releases

Summer’16 Preview Features – Awesome Admin

Hey all …! Before we dive into the biggest Salesforce 50th release – Summer’16 features, let me thank Mike Gerholdt and LeeAnne Templeman for awesome admin webinars they do with every salesforce release. Actually, I’m not a blogger. But I started blogging with my first post based on the Awesome Admin take over Spring’16 video.  So, I’m here again with Summer’16 preview admin features.

Get a Pre-Release org for yourself:

  • Go and grab a pre-release org if you don’t have one for yourself for checking awesome brand new features, not only for this release but you can check for every upcoming releases as well, cool 😀 .
  • Sign up here to get a Summer’16 pre-release org and mark your credentials for coming further releases.
  • Don’t forget to join the Release Readiness & Feature Adoption group in Success Community managing by Samanthia Achuff. Always stay up to date on every release features, mark the key dates and join the live events

Contact with Multiple Accounts:

  • Salesforce is finally releasing the Shared Contacts feature in this release after having 63,730 Idea Exchange points.
  • Contacts with Multiple Accounts, lets your sales reps easily manage the relationships between people and businesses without creating duplicate records
  • Every contact needs to be associated with a Primary account (the account that appears in Account Name on the Contact).
  • The primary account represents a direct relationship; the other accounts associated with a contact represent indirect relationships
  • How you can see this feature ? Go to Account Settings in Setup and click the “Allow users to relate a contact to multiple accounts” checkbox and save.
  • This feature is available in Lightning Experience, Salesforce Classic, and all versions of the Salesforce1 mobile app.
    Contact with X Accounts
    Direct and Indirect

Create a Calendar from Anything:

  • Do you and your users want an easy, visual way to track upcoming or ongoing campaigns? Support cases? Retail store events? Opportunities due to close?
  • Create a calendar from a standard or custom object by choosing a date or date/time field representing data they want to track.
    activities-calendar-create-new-calendar
  • Follow the below steps to create a new calendar.
    1. Click on’New Calendar’
    2. Select any Standard or Custom object with having at least one Date field
    3. Give a name to your calendar
    4. You have to select ‘Field for Start’ and ‘Field for End’. If you select Date field in ‘Field for Start’ then all Date/Time fields are grayed in the ‘Field for End’
    5. Filter your data to be displayed on the calendar by selecting a list view you have defined for the object
    6. Select the field to represent the items on the calendar
  • This feature is available in Lightning Experience only.

Calendar-step1

Calendar-step2

Final calendar

Find All News with One Click:

  • The News app is a one-stop shop where your users can quickly catch up on the latest happenings about the companies and industries that matter most to them
  • News will be displayed based on recently viewed accounts and opportunities, and on tasks and events for those accounts—which is the same criteria used to select insights for the Lightning Home page.
  • But, unlike the Home page, the News app is all news, all the time.
  • This feature is available in Lightning Experience and all versions of the Salesforce1 app.

News tab

Create New Accounts Lightning Fast with Account Autofill:

  • When reps start typing a company in the Account Name field, we’ll offer up suggestions based on text entered
  • When a rep selects a company from the list, salesforce auto-fill several other fields with data, like Website, Phone, Ticker Symbol and Billing Address (headquarter location).
  • The suggestions include US-based companies. All these are coming from Data.com
  • This feature is available in Lightning Experience only.
  • How you see this feature in action? Go to Setup > Account Settings and check the ‘Enable Account Autofill’

202_account_autofill

Visualize Your Business Like Never Before with Account Logos (Beta):

  • From Account Settings, select the option to allow logos. Twitter LogoCheck the ‘Enable Account Logos’
  • Logos show up automatically, when available, on US-based accounts based on Data.com.
  • If you use Social Accounts, logos that reps added manually from social networks may be replaced with a fresher, more up-to-date logo
  • If you’re not completely satisfied with a logo, for any reason, contact Salesforce Customer Support to remove the logo from the account.
  • This feature is available in Lightning Experience and all versions of the Salesforce1 app.

Set Custom Home Pages:

  • You can set the default home page in two places.
    1. Lightning App Builder—From Setup, enter Lightning App Builder in the Quick Find box, then select Lightning App Builder.

      After you save a page, click Activate from the Page Saved dialog, or click Activation later.

    2. Home in Setup—From Setup, enter Home in the Quick Find box, then select Home.
  • All users see the default Home page unless they have profiles that are assigned to another Home page.

Custom Home Page

Assign Custom Home Pages by Profile:

  • You can set page assignments by profile in 2 places.
    1. Lightning App Builder—From Setup, enter Lightning App Builder in the Quick Find box, then select Lightning App Builder. After you save a page, click Activate from the Page Saved dialog, or click Activation and select Assign this Home page to specific profiles.
    2. Home in Setup—From Setup, enter Home in the Quick Find box, then select Home. Then click Set Page Assignments. You can also click action list dropdown next to a profile and select Change Assignment.
  • You can use the Lightning App Builder to assign profiles to a single Home page, but Home in Setup offers more control over page assignments.


Create or Edit Lightning Experience Record Pages:

  • Create a record page from scratch, or make a copy of an existing record page right from the Setup menu.
  • Give your users a customized view for each object’s records by adding, editing, or removing components to change the page’s layout.
  • We added a Lightning Record Pages related list to all objects that support record page editing in the Lightning App Builder. You can see all the custom record pages you’ve created for that object and which record page is active.
  • This feature is available in Lightning Experience only.

Edit record page

View Record Pages

Edit Objects Directly from the Setup Menu:

  • On object home and record pages, you can select Edit Object from the Setup menu to go directly to that object’s detail page.
  • This feature is available in Lightning Experience only.

Note: The Edit Object menu option is available only for objects that are listed in the Object Manager in Lightning Experience.

Edit Object


Power of Flows in LEX and SF1 (Pilot) :

  • You can now add flows to any Lightning page–App pages, Record pages, and Home pages alike.flow_labrecordpage.png


Remove a Picklist Field Value from Records:

  • An easy way to remove a picklist value from all records in your org. Select any 3 options display while removing value.
  • This process works for standard and custom picklists (restricted or unrestricted).
  • One shot – all your records of the object are updated 😀 
  • This feature is available in both Lightning Experience and Salesforce Classic.

Remove picklist value from records


Share Notes with Other Users or Groups:

  • How you will see this effect in org ?

Enable Notes

  • Sales users can now collaborate more easily by sharing notes with their teammates or Chatter groups.
  • Recipients of a shared note can view notes but not edit them. Also recipients will receive an email of shared note.
  • This feature is available in both Lightning Experience and Salesforce Classic.

Share Notes


Automatically Get Geocodes for Addresses:

  • Geocodes identify a location using latitude and longitude.
  • You can set up and activate the geocode clean rules for your org. You can set up geocode clean rules in Salesforce Classic only
  • Geocodes are added to the pre-existing latitude and longitude fields on accounts, contacts, and leads.
  • By default, these fields aren’t visible on records, but you can check them out in a few ways, including using custom formula fields and querying the Salesforce API.

Note: Person accounts are not supported

Geocodes


Processes Can Execute Actions on More Than One Criteria:

  • Now you can choose what happens after your process executes a specific action group. Should the process stop, or should it continue evaluating the next criteria in the process? It’s up to you!

continue_criteria


Salesforce1 Features

Quickly See If Related Lists Include Records:

  • The mobile app now includes an easy-to-read counter for each related list on a record’s Related page.mobile_related_lists_counter_202

Copy and Paste Text on Record Detail Pages:Cut copy paste.png

  • Salesforce1 now includes support for the standard
    Android and iOS copy, cut, and paste gestures when viewing, creating, and editing record details
  • For example, a sales rep can copy field values from an account detail page and paste the values to fields when editing a contact or creating an opportunity. Pasting copied data is supported on edit pages and when using create and update quick actions

Get Account Insights on Opportunities:

account_insights_opportunities_s1

  • Sales reps can see the latest breaking news about their accounts when viewing opportunity records.
  • Insights are based on the account that’s associated with the opportunity and are selected using the same criteria as for selecting insights for accounts.

Change a Record’s Owner:

  • Salesforce1 users can nowsalesforce1_change_owner 
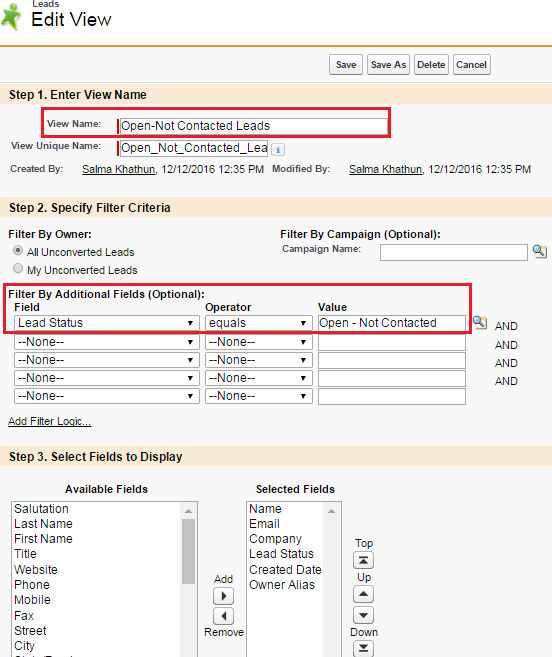
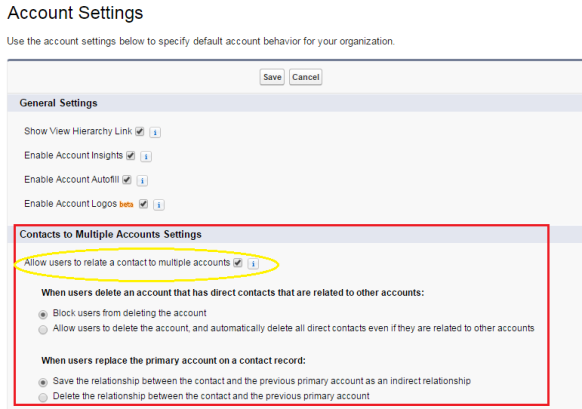
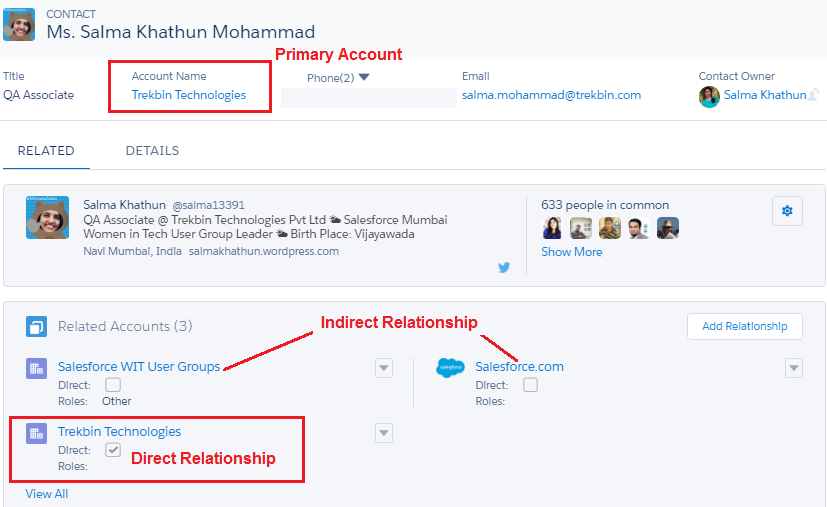
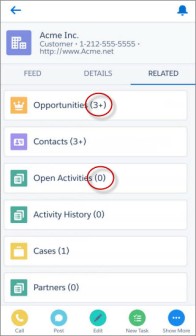
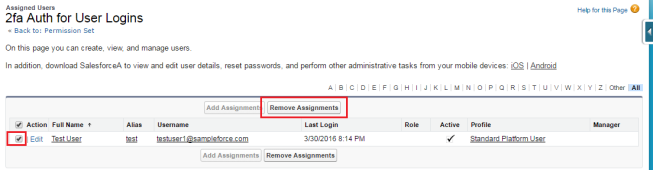
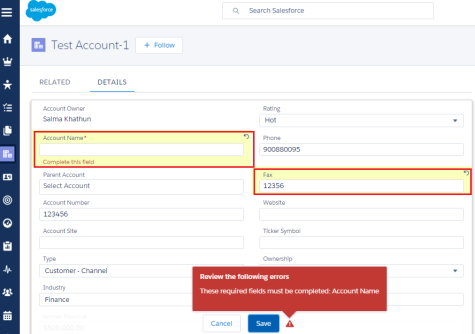
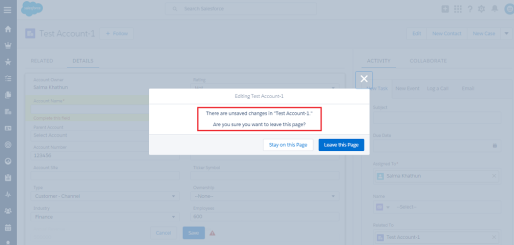
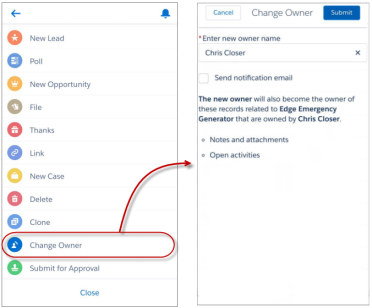
change record owners for accounts, campaigns, cases, cont
    acts, leads, opportunities, work orders, and custom objects.
  • The new Change Owner action, accessible from the action bar, is available in all versions of the Salesforce1 mobile app.
  • The Change Owner action appears only if the user has permission to change record ownership.

Team Up on Accounts:

  • Tap the Account Team card to get rn_salesforce1_account_team_cut
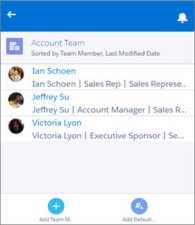
detailed information about the
    team’s members, add coworkers to the team, or add the record owner’s default account team.

  • Tap a team member’s name to change their role or adjust their access level, or remove the member from the team.


Posted in Salesforce Security

Say NO to Hacker by Salesforce 2FA

What is Authentication ?

  • 10-most-notorious-hackers-of-all-timeAuthentication is how you prove to a system who you are to gain access. That mean, you can get into system, a valid users can get in but not the bad guy.
  • This is made up of something you KNOW. That is something you have to remember.
    Ex: Pin number or Password.
  • Or something you HAVE. That is something unique in your possession.
    Ex: ATM card or Mobile phone.
  • Or something you ARE. That is bio-metrics.
    Ex: Retina scan or Finger print.
    my-phone-is-me-hot-topics-in-authentication-3-638

Risk Based Authentication in Salesforce:

  • If any user tries to login in to the Salesforce org from an ODD device or browser, then verification code is sent via as Email or Mobile message. Salesforce platform always perform what’s known as risk based authentication.
  • When users login, salesforce analyze those logins, looking at their network location and whether or not we have seen their browser before.
  • One time passwords are set via email or text message when salesforce do not recognize the user’s network or browser.
  • We can view or adjust this information by browsing the Setup, Security Controls, Activations.
  • There you can see users activated networks and their activated browsers.
  • You can even delete them or remove them from the system
    No History about login.png
  • Email Activation.png
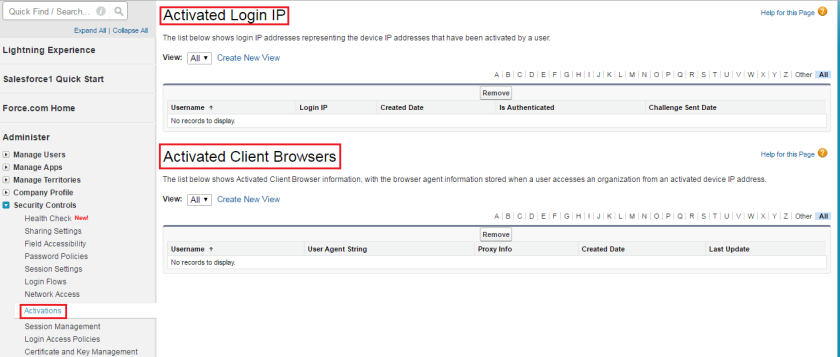
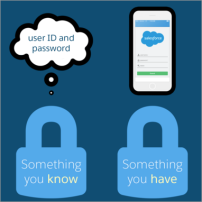
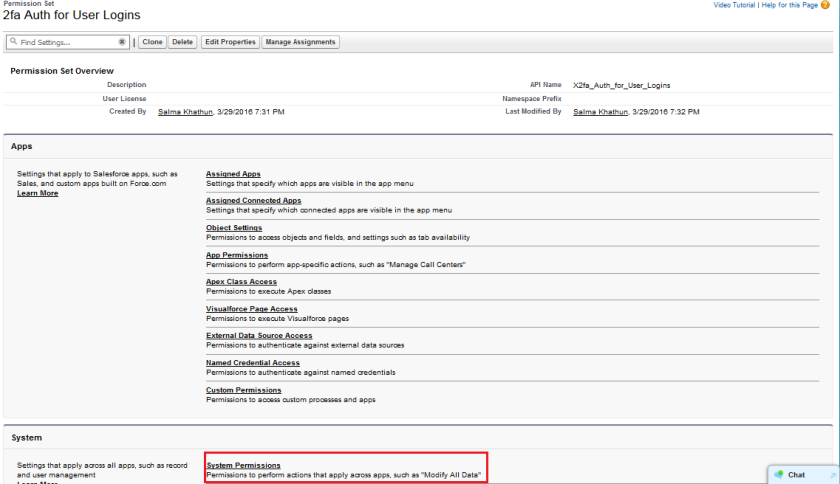
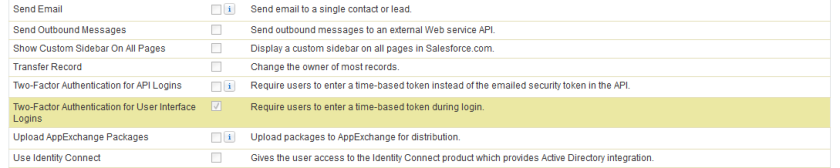
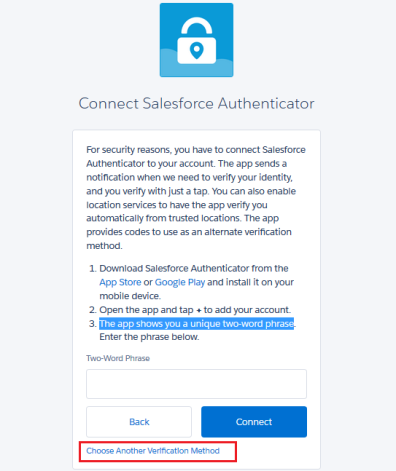
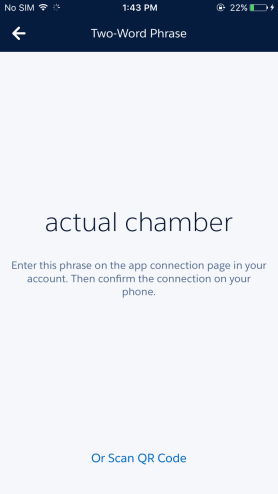
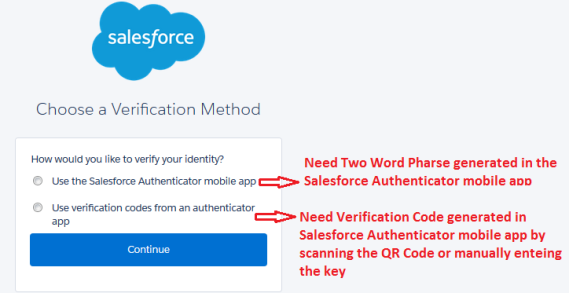
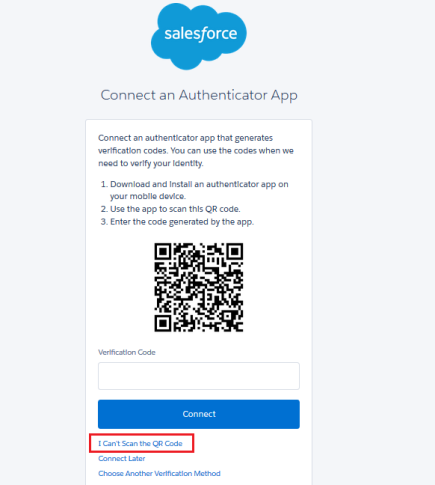
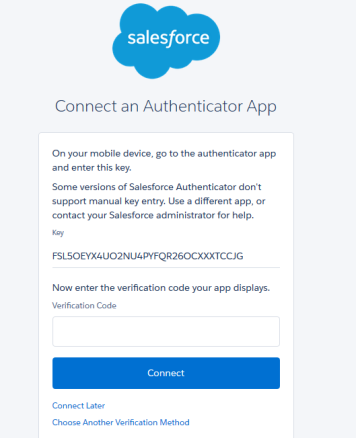
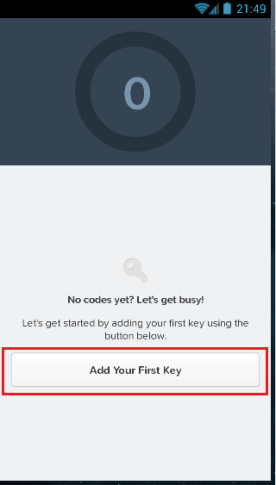
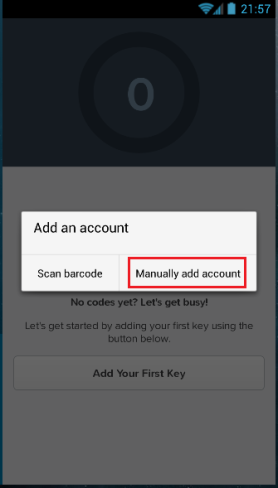
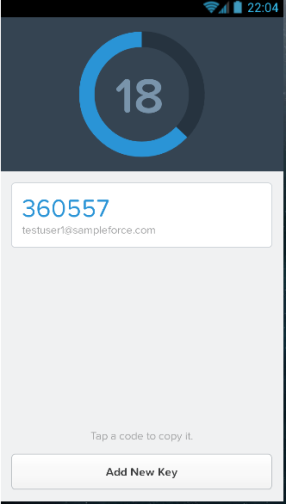
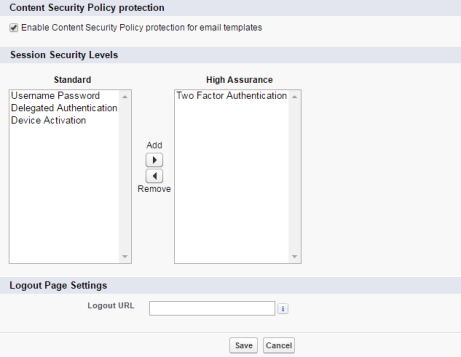
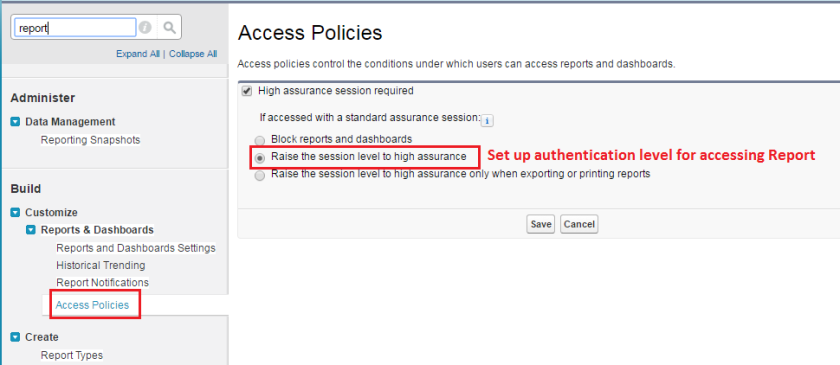
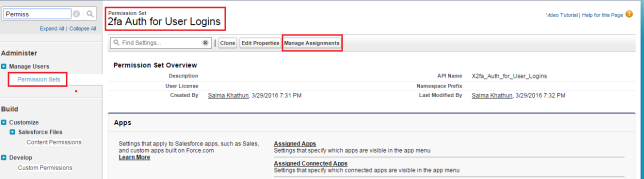
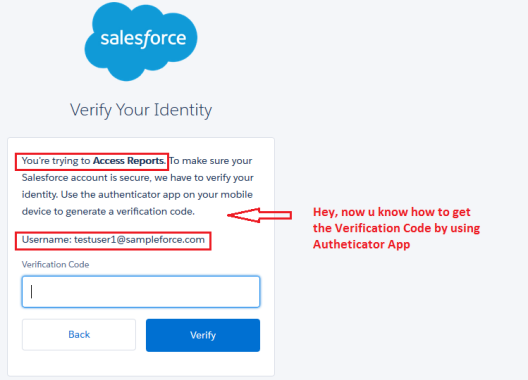
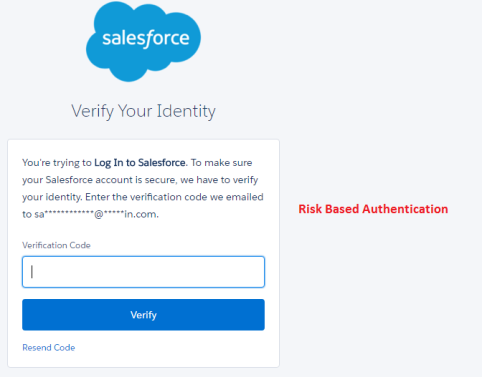
In addition, you can provide input into a risk based authentication by setting up Trusted networks via Setup, Security Controls, Network Access or via profile based IP restrictions. Check here if you are new to setting Trusted IP Ranges


Two Factor Authentication:identity_2fa_know_and_have

  • Combining any two of the three types of authentication is called Two Factor Authentication.
    Ex: password + phone authenticator app
  • Two factor authentication adds another layer of security by making you type in a second temporary password.
  • Also, it builds on the top of risk based authentication and introduces a few key capabilities
  • The first are applications for mobile devices that are allowed to generate those OTPs (One Time Passwords)
  • No longer there is dependency on email or SMS. You can generate one time password directly from an app on your phone.


Setting Up Two-Factor Authentication:

  • As a Admin, you need to make all employees supply more than their username and password every time they try to access the  your Salesforce org.
  • Best practice is to create Permission Sets for those users you want to set up 2FA for every time they login. Check the Permissions Sets if you are very new to this topic.
  • Typically, you create a permission set for a group of users. But for this example, we set up for one user
    • Log in again as the system administrator of your DE org.
    • From Setup, enter Permission in the Quick Find box, then select Permission Sets.
    • Click New.
    • Label the permission “2fa Auth for User Logins”.
    • Click Save.
    • Under System, click System Permissions. Now you’re on the detail page for the 2fa Auth for User Logins permission set.
    • Click Edit.
    • Select Two-Factor Authentication for User Interface Logins.
    • Click Save.

2FA Auth.png

2FA Auth

  • Now, we have to assign the newly created Permission Set to the user we have to set up 2FA. If you’re not on the detail page for your new permission set, navigate back there.
  • On the detail page of the new permission set, click Manage Assignments.
  • Click Add Assignments. On the list of users, select the check box next to user’s account. (If you wanted, you could assign up to 1,000 users at a time.)
  • Click Assign

2fa-auth2

2FA Auth.png

  • Now when the ‘Test User’ login to the Salesforce org, he/she will be prompted with Two Factor Authentication.


Connect the Salesforce Authenticator Mobile App to a User Account:

  • Login as ‘Test User’ now by providing basic Single Factor Authentication, that is Username and Password.
  • You will redirect Email/Mobile SMS screen for the Risk Based Authentication (user is logging  to salesforce for first time on that device/browser), if salesforce doesn’t recognize your device.
  • After providing the correct Verification Code, you will be prompted with the below screen for Two Factor Authentication
App.png
Desktop: Connect Salesforce Authenticator
  • As displayed in above screen, we have to first install the ‘Salesforce Authenticator’ app from App Store or Google Play in mobile device
  • Once you have installed successfully the Salesforce Authenticator app in your mobile, you can get the verification code in 2 different methods:
    1. Get a Two-Word Phrase and click on Connect
    2. Get a QR Code or manually entering a key


Get a Two-Word Phrase:

  • Alright! We are there now. Open the ‘Salesforce Authenticator’ app in your mobile device.
  • You’ll see a + icon with message as Let’s get started! Connect your personal and work accounts to Authenticator.
  • Tap on the + icon

IMG_0247

  • You’ll now see a Two-Word Phrase as below:
IMG_0248.PNG
Mobile: Two Word Phrase Screen
  • Now enter the two-word phrase “actual chamber” as displayed in the ‘Desktop: Connect Salesforce Authenticator‘ screen above and click on the Connect


Get a verification code by scanning QR Code:

  • Salesforce has another alternative method for 2FA by scanning your QR Code displayed on the screen.
  • HOLD ON !!!! If you’re  already logged in as ‘Test User’ successfully in salesforce org.
  • Before going to below process, let’s Logout  as ‘Test User’
  • Again try to login as ‘Test User’ in your desktop. Provide Username & Password and provide verification code if salesforce doesn’t recognize your device or network location (Risk Based Authentication)
  • Whew!! Again you’re there at ‘Desktop: Connect Salesforce Authenticator‘ screen
  • This time click on ‘Choose Another Verification Method’ link
  • You’ll be redirected to the below page. Choose ‘Use Verification codes from an authenticator app‘ and click on Continue.
App.png
Desktop: Choose a Verification Method
  • Now, you will be redirected to the below page for scanning the QR Code from mobile authenticator app
QR Code.png
Desktop: QR Code Page
  • So, open the ‘Salesforce Authenticator’ app in your mobile device.
  • You’ll see a + icon with message as Let’s get started! Connect your personal and work accounts to Authenticator.
  • Do not tap on the + icon
  • This time you observe another option below as Or Scan QR Code‘. See the ‘Mobile: Two Word Phrase Screen‘ page
  • Tap on the ‘Or Scan QR Code’. App ask for the use of camera for scanning the QR Code, click Allow
  • You’ll be seeing the screen as below with red square box as below:
IMG_0249.PNG
Mobile: QR Code Scan Screen
  • That’s it ! Scan the QR code display in desktop with your Authenticator App
  • Salesforce Authenticator app will generate a 6 digit code as below for the ‘Test User’. Now take a zoom at the green circle displays next to code. This code only activates for 30 seconds. For every 30 seconds Salesforce Authenticator app generates a new and unique verification code, isn’t that Cool !


Get a verification code by manually entering key:

  • Okay. Sometimes you don’t want allow your camera for scanning the QR code. In that case, again, salesforce has another alternative  🙂
  • This time you can enter a key displayed on the Salesforce Authenticator app
  • If you’re  already logged in as ‘Test User’ successfully in salesforce org.
  • Before going to below process, let’s Logout  as ‘Test User’
  • Again try to login as ‘Test User’ in your desktop. Provide Username & Password and provide verification code if salesforce doesn’t recognize your device or network location (Risk Based Authentication)
  • Whew!! Again you’re there at ‘Desktop: Connect Salesforce Authenticator‘ screen
  • This time click on ‘Choose Another Verification Method’ link
  • Choose ‘Use Verification codes from an authenticator app‘ and click on Continue.
  • Now you will be redirected to the ‘Desktop: QR Code Page‘ page for scanning the QR Code from mobile authenticator app
  • Click on the ‘I can’t scan the QR Code link‘ below. You will be navigated to the below page with the Key.

QR Code

  • So, open the ‘Salesforce Authenticator’ app in your mobile device (Imagine your mobile doesn’t the scanning QR Code process)
  • You’ll see a screen as below. Tap on the ‘Add Your First Key‘ button

QR Code

  • A pop-up will display for selecting process for adding an account as below. Tap on ‘Manually Add Account

QR Code.png

  • Provide the Username and Key displayed in the above screen.

QR Code

  • Tap on the Submit button. Whew!! You got the verification code now

QR Code.png

Set up Authentication Level based on policies:

  • Salesforce identity doesn’t require to enforce Two Factor Authentication only on Login. It can also do this dynamically based on your Session Level.
  • Firstly, navigate to Session Settings. You can see that we have new level called ‘Session Security Levels

QR Code.png

  • There are 2 session levels within Salesforce, one is Standard Assurance and other is High Assurance sessions.
  • Using this session levels we can set fine green policies for accessing Applications or access to Reports and Dashboards.
  • For example, you require a High Assurance session level is used to access Reports
    • To set this navigate to Setup > Customize > Reports & Dashboards > Access Policies
    • Click on ‘High assurance session is required’ and select the ‘Raise the session level to high assurance’
    • Click on Save

QR Code

Access Reports with user having Standard Assurance Level:

  • Login into salesforce org as Admin.
  • Now, remove the ‘Test User’ from the “2fa Auth for User Logins” Permission Sets created above for Two Factor Authentication.
    • To do this, navigate to Setup > Manage Users > Permission Sets
    • Click on the “2fa Auth for User Logins” Permission Sets
    • Click on the ‘Manage Assignments’ button
    • Select the ‘Test User’ and click on ‘Remove Assignment’

QR Code

QR Code

  • At this point of time, ‘Test User’ is having only Standard Assurance Level that is Username and Password.
  • Now login as ‘Test User’ by giving Username and Password.
  • On successful login, ‘Test User’ is redirected to salesforce org.
  • Okay !! It’s time to click on ‘Reports’ tab
  • You have to redirected to High Level Assurance page, woohoo!

QR Code

  • Come On !! Open the Salesforce Authenticator app in your mobile and grab the time based token and paste in the verification code box here
  • Click on Verify button. That’s it! you are able to access the Reports and Dashboards now 🙂


References:
1. Securing Your Users’ Identity Trailhead
2. Ensuring Security with Two Factor Authentication Video


Posted in Salesforce Releases

My First Blog – Awesome Admin Spring’16 Features

Chatter: Broadcast Groups :

  • Broadcast groups are a special type of public, private, or unlisted group where only group owners and managers can create posts.
  • Group members can respond to posts.
  • Creating broadcast groups is ideal when one person or a set of individuals regularly needs to share information with a large group of people.
  • This feature is available in both Lightning Experience and Salesforce Classic.

test

Chatter: Banner Photos :

  • Update group banners with your own images to include your company’s branding on your group page or to add a bit of fun and color.
  • To update the group banner, click the camera icon on the top right of the image. For best results, use a panoramic image that is at least 1280 x 300 pixels and less than 8 MB in size
  • This feature is available in Lightning Experience only

test

 Monitor Group Member Activity in Group Report :

  • See the number of members, posts, comments, likes, questions, and answered questions in a single view for each group.
  • Group owners, managers, and other users with permissions (for example, users with the “Modify All Data” and “Manage Unlisted Groups”) can quickly access this report by clicking Show Group Report
  • This feature is available in Salesforce Classic only.

test

test

User Profiles with a Banner Photo and Profile Photo :

  • A banner photo allows your users to personalize how their profile looks when other users view it. Your users can upload any photo, but we recommend using a panoramic photo that is at least 1280 x 300 pixels.
  • The user can then quickly choose to view, update, or delete their photo
  • This feature is available in Lightning Experience only.

user profile banner

Ability to Edit Feeds :

  • Edit Chatter Posts Containing Files or Links. Available in Salesforce Classic only
  • Now, it’s quicker than ever to keep everyone informed. User @mention suggestions are more relevant and list users who you interact with the most instead of an alphabetical list. This feature is available in both Lightning Experience and Salesforce Classic.
  • Users can now refresh a Chatter feed without refreshing the entire page. This feature is available in Lightning Experience only.

test.png

test.png

Multi-File Community Record Feed Posts :

  • Community users can now attach multiple files to a single post.
  • When a multi-file feed post on a record in a Community is viewed in Lightning, multiple thumbnails and previews are displayed.
  • Users can add up to five files to a single feed post.
  • Click any thumbnail to view the files in the new multi-file previewer. From there, you can click through all the files in the post, download each file, and access other quick actions in the toolbar.
  • This feature is available in Lightning Experience only.

picklist

filre preview.png

Customize the Lightning Experience Navigation Menus :

  • Users can now customize your Navigation Menu with the Spring’16 release. Users now can see the custom object tabs in the Navigation Menu.
  • Also, Navigation Menu can assign to more than one user’s Profiles
  • Most of the items that appear in the App Launcher can appear in a navigation menu.
    • Your org’s custom objects and apps
    • Most standard objects
      Even if the objects aren’t supported in Lightning Experience yet, you can add many of them to navigation menus. When clicked, the objects open in Salesforce Classic in another tab.
    • Visualforce tabs
    • Lightning Component tabs
    • Canvas apps via a Visualforce tab
    • Web tabs

Note: You can’t add connected apps like Gmail™ and Microsoft Office 365™ or Lightning Pages to navigation menus. Users access them from the App Launcher

Menu.png

Menu.png

Menu

Edit Inline in Lightning Experience :

  • Reps can now edit individual fields on a record details tab and easily edit multiple fields at one time
  • Error messages – instead of appearing at the top of the form, error messages appear in a window at the bottom. Reps can click to hide the window when scrolling through a long record.
  • Users are warned if they try to navigate away before saving a record. No more lost edits!
  • Reps can navigate within the page while editing a record. They can switch to the record’s chatter feed and back without losing changes

Note: Right now, inline editing works only when editing record details. Soon, it’ll be available in the Highlights panel and list views.

Inline Edit Pencil

test


Inline Edit Pencil

Person Accounts: Supported in Lightning Experience(Beta) :

  • Person accounts take the standard business-to-business account model and extend it to include business-to-consumer sales, so you can capture information about individual people with whom you do business.
  • If you used person accounts in your org before Spring ’16, you couldn’t enable Lightning Experience in production. But the wait is over! You can enable Lightning within 24 hours after the Spring ’16 release.


Preview Your Production Org in Lightning Experience :

  • The Migration Assistant’s Preview feature lets you explore your production org in Lightning Experience, so you can see exactly how your real data and your current customization’s work in the new interface. Without disrupting anyone.
  • To get started, from Setup, enter Lightning in the Quick Find box, then select Lightning Experience. Click Preview to dive in.


Restricted Picklists (Beta) :

  • You have done a lot of typos while importing data which contains picklist field? Later you again super cleaned your data? What a Pain!
  • Now you can enforce only picklist field values you’ve defined while importing. A restricted picklist field includes only the values that you’ve defined.
  • Your picklist data stays clean, because users can’t add erroneous or redundant values.
  • This feature is available in both Lightning Experience and Salesforce Classic

picklist.png

  • Record is not inserted successfully and error is displayed as below  when I have imported the data by giving the value as ‘Reddd’
    INVALID_OR_NULL_FOR_RESTRICTED_PICKLIST: Sample Color: bad value for restricted picklist field: Reddd: Sample_Color__c —

picklist

Global Picklists (Pilot) :

picklist

  • Are you creating same picklist multiple times for different objects ? What a redundant work !
  • No worries! With Salesforce Spring’16 release, you can access the Global Picklists everywhere 😀
  • Global picklists let you efficiently reuse a single list of values for multiple custom picklist fields.
  • Easily share picklists across objects by creating picklist fields based on the master list of values.
  • Your picklist data stays clean because users can’t add erroneous or redundant values through the API.
  • This feature is available in Salesforce Classic only.

picklist


Important points about Global Picklists :

  • A global picklist is a restricted picklist by definition. When you create a global picklist, the list of values you specify is protected.
  • Only you can add or change values by editing the “master” picklist. When you create a custom picklist and base it on the global picklist, its list of values is automatically populated and non-editable.
  • Users can’t load extraneous values to the global picklist or to picklist fields that are based on it through the API.

picklist

Easily Reorder Criteria in Your Process with Drag and Drop :

  • Previously, to change the order, you had to delete and redefine criteria and actions, aah!
  • Save time and clicks by quickly changing the order of criteria and action groups in your process. Just drag and drop—it’s that easy.

filre preview

Few Imp Points regards to Process Builder :

  • Tired of retyping names and descriptions for new versions of your process? That’s over. Reuse Names and Descriptions When Creating a New Process Version
  • New versions use the name and description from the original version. You can edit the name and description or leave it as is.
  • Cloned processes are assigned a version number, so you don’t need to worry about keeping track of different versions.
  • You can’t change the API name when you create a new version of a process. API names are forever.

filre preview

  • View Field Names in Your Process at a Glance.  You can see what’s being evaluated or updated at a glance. Just hover over the field name in the criteria or action side panel to see the entire name.

filre preview

  • Easier Mentions in Post to Chatter Actions. We’ve simplified the way you mention users or groups in Post to Chatter actions. Instead of inserting mentions with a separate field, just use the @ symbol to add mentions directly to the message.

filre preview


References:
  1. https://resources.docs.salesforce.com/200/latest/en-us/sfdc/pdf/salesforce_spring16_release_notes.pdf
  2. https://www.youtube.com/watch?v=MnqVP-xtw0Q

Click to access salesforce_spring16_release_notes.pdf